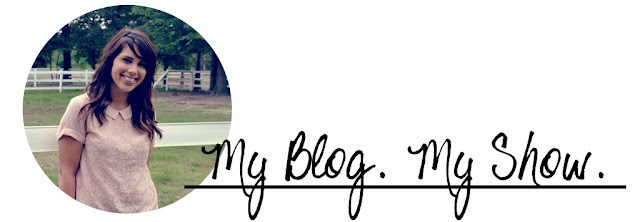
I'm sure you can information of this kind on numerous other blogs but here is how I made my blog header.
It's a bit convoluted but I used Gimp and Picasa to accomplish this.
Step 1: Open your photo of choice in Gimp.

Step 2: From your Toolbox choose the 'Ellipse Select Tool' (I usually have to double click on it to turn on). Click 'Fixed: Aspect Ratio' and I like to click on 'Expand from center,' also.

Step 3: Create your circle on the photo (this may take a couple tries to get the exact area you want).

Step 4: Once you've selected your circular area go to the 'Edit' drop bar and select 'Copy.' Then, again in the 'Edit' drop bar, select 'Paste as...' and 'New Image.' This should pop up.

Step 5: Save the new circle image as a JPEG (the background will be white as a JPEG) - I save mine to my desktop so it's easy to find in Picasa. Mine asks me to export first which I do.


Step 6: Open Picasa and pull up your new circle photo (It's on the left column under 'Folders' and 'Desktop').

Step 7: In the 'Create' drop tab choose 'Picture Collage.'

Step 8: Leave it in 'Picture Pile' so you can move it around as you please. Under 'Page Format' I made a 'Custom Aspect Ratio' to 15x40 and turned it to landscape (those little buttons right underneath 'Page Format' that look like a mountain range or a portrait.)

Adjust the photo as you wish I put mine to the left of the collage (you can adjust the size of the photo as well - it's all preference). I also prefer to uncheck the 'Draw Shadows' option. Click 'Create Collage.'
Step 9: Now pull up your new collage and you can edit it however you wish (there are tons of options in Picasa). I just added some text in my preferred font and adjusted the size and placement. I also cropped the collage a bit.


Step 10: Choose the 'Export' option at the bottom. I export it at 1024 pixels but play around with how it looks once it's on your blog - you might want to export it at 800 pixels.

Step 11: Add it to your blog! Blogger --> Layout --> Edit Header --> Choose Image --> Click 'Instead of title and description' --> Save.
If you want to play around with the placement of your new header go to Template --> Advanced --> Add CSS --> and paste this code:
.header-outer {
margin-left:90px;
}
Mess with that number in red to adjust where the header sits.

There are a lot of steps to this guy but I was pretty happy with how it turned out and I had been asked previously if I could share how I made my header. Hope that was helpful! Let me know if you have any questions or if there was any confusion :)

It's a bit convoluted but I used Gimp and Picasa to accomplish this.
Step 1: Open your photo of choice in Gimp.

Step 2: From your Toolbox choose the 'Ellipse Select Tool' (I usually have to double click on it to turn on). Click 'Fixed: Aspect Ratio' and I like to click on 'Expand from center,' also.

Step 3: Create your circle on the photo (this may take a couple tries to get the exact area you want).


Step 5: Save the new circle image as a JPEG (the background will be white as a JPEG) - I save mine to my desktop so it's easy to find in Picasa. Mine asks me to export first which I do.


Step 6: Open Picasa and pull up your new circle photo (It's on the left column under 'Folders' and 'Desktop').

Step 7: In the 'Create' drop tab choose 'Picture Collage.'


Adjust the photo as you wish I put mine to the left of the collage (you can adjust the size of the photo as well - it's all preference). I also prefer to uncheck the 'Draw Shadows' option. Click 'Create Collage.'
Step 9: Now pull up your new collage and you can edit it however you wish (there are tons of options in Picasa). I just added some text in my preferred font and adjusted the size and placement. I also cropped the collage a bit.


If you want to play around with the placement of your new header go to Template --> Advanced --> Add CSS --> and paste this code:
.header-outer {
margin-left:90px;
}
Mess with that number in red to adjust where the header sits.

There are a lot of steps to this guy but I was pretty happy with how it turned out and I had been asked previously if I could share how I made my header. Hope that was helpful! Let me know if you have any questions or if there was any confusion :)
No comments:
Post a Comment